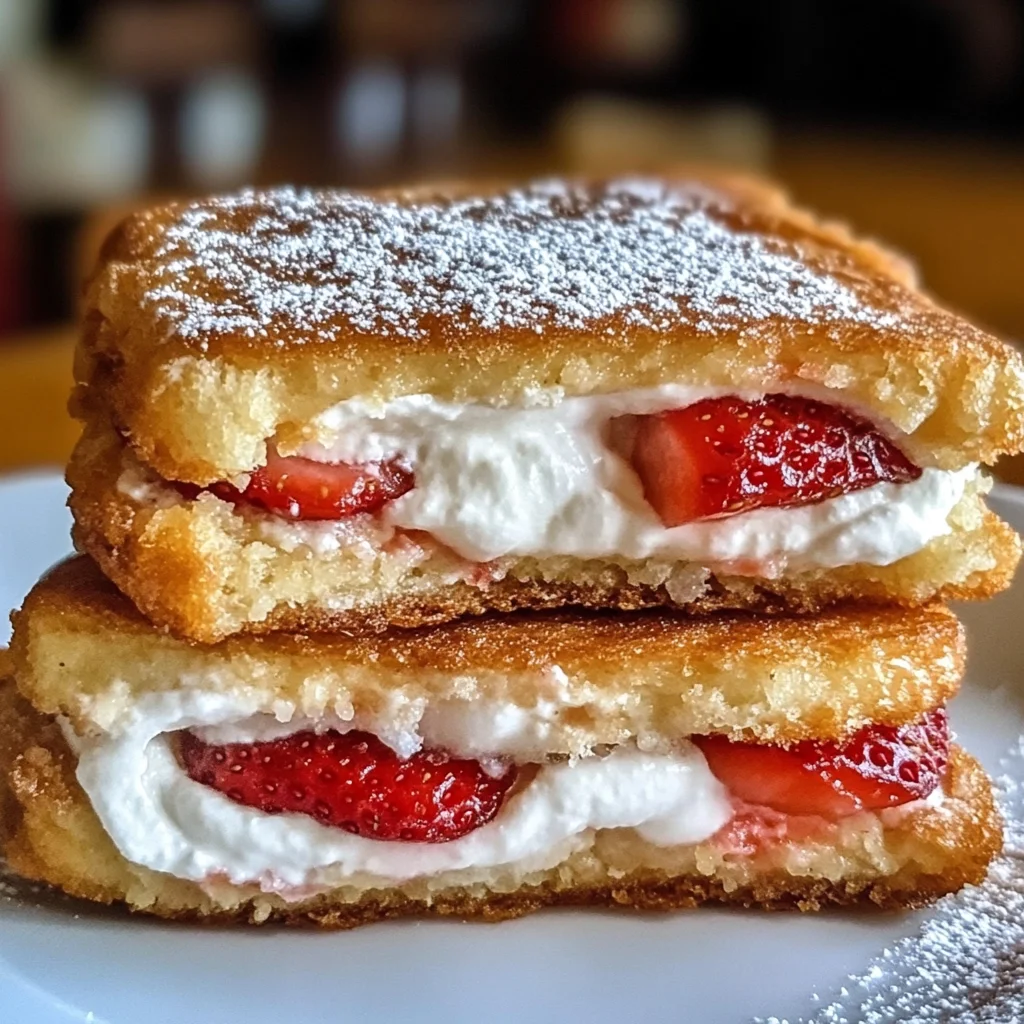
Fried Strawberry Cheesecake Sandwiches
If you’re looking for a sweet treat that feels like a warm hug, these Fried Strawberry Cheesecake Sandwiches are just the thing! This recipe combines crispy bread with a luscious cheesecake filling and fresh strawberries, making it perfect for breakfast, dessert, or even a cozy afternoon snack. Whenever I make these sandwiches, they remind me of sunny days and cheerful gatherings. They’re not just delicious; they also bring everyone together!
What makes this recipe special is how easy it is to whip up. Whether you’re cooking for your family on a busy weeknight or impressing friends at a gathering, these sandwiches will surely be a hit. Trust me; once you take that first bite, you’ll be hooked!
Why You’ll Love This Recipe
- Quick to Prepare: With just 10 minutes of prep time, you can have these sandwiches ready in no time!
- Family-Friendly Fun: Kids love the sweet flavors, and they can even help assemble the sandwiches.
- Versatile Treat: Perfect for any occasion – breakfast, brunch, or as an after-dinner delight.
- Deliciously Decadent: The combination of cream cheese and strawberries creates an irresistible flavor that’s hard to resist.
Ingredients You’ll Need
Let’s gather some simple and wholesome ingredients to create our Fried Strawberry Cheesecake Sandwiches. You probably have most of them in your kitchen already!
- 8 slices of brioche or challah bread
- 4 oz cream cheese, softened
- 2 tbsp powdered sugar (plus more for dusting)
- 1/2 cup fresh strawberries, sliced
- 1/4 cup strawberry jam
- 2 large eggs
- 3 tbsp milk
- 2 tbsp butter (for frying)
Variations
One of the best things about this recipe is its flexibility! You can easily switch up ingredients based on what you have on hand or your personal preferences.
- Add More Fruit: Try adding sliced bananas or blueberries along with the strawberries for extra flavor.
- Change the Bread: Use whole wheat or gluten-free bread for a different twist while keeping it delicious.
- Sweeten It Up: Swap out powdered sugar for maple syrup in the cream cheese mixture for a unique taste.
- Go Nutty: Add chopped nuts like pecans or walnuts into the filling for added crunch.
How to Make Fried Strawberry Cheesecake Sandwiches
Step 1: Prepare the Cream Cheese Filling
In a small bowl, mix the softened cream cheese and powdered sugar until smooth and creamy. This step is important because it creates that rich cheesecake flavor that pairs perfectly with the strawberries.
Step 2: Assemble the Sandwiches
Spread the cream cheese mixture onto one side of four bread slices. Then, add sliced strawberries and a spoonful of strawberry jam on top of the cream cheese layer. Cover with the remaining bread slices to form sandwiches. Assembling them this way keeps all those delightful flavors tucked inside!
Step 3: Whisk the Egg Mixture
In a shallow dish, whisk together the eggs and milk. This egg wash is key because it helps achieve that golden-brown crust when frying.
Step 4: Dip and Fry
Dip each sandwich into the egg mixture, ensuring both sides are evenly coated. Heat a large skillet over medium heat and melt 1 tablespoon of butter. Place the sandwiches in the skillet and fry for 2-3 minutes on each side or until they’re perfectly golden brown. Frying gives these sandwiches their delicious crunch.
Step 5: Drain and Serve
Remove from the skillet and let drain on a paper towel-lined plate. Dust with powdered sugar before serving to add that final touch of sweetness! Enjoy your decadent Fried Strawberry Cheesecake Sandwiches warm – they’re simply irresistible!
Pro Tips for Making Fried Strawberry Cheesecake Sandwiches
Making these Fried Strawberry Cheesecake Sandwiches can be a delightful experience, and a few simple tips can elevate your dish to perfection!
-
Use fresh ingredients: Fresh strawberries and quality bread enhance the flavor and texture of your sandwiches, making each bite more enjoyable.
-
Don’t rush the frying: Frying at medium heat allows the bread to become perfectly golden and crispy without burning. This ensures a delightful crunch every time.
-
Customize your filling: Feel free to experiment with different fruits or flavored jams. Raspberries, blueberries, or even a drizzle of chocolate can add unique flavors that make this dish your own.
-
Let them rest: After frying, allow the sandwiches to drain on paper towels for a minute before serving. This helps remove excess oil, keeping them light and airy.
-
Serve warm: Enjoying these sandwiches right after cooking ensures you experience the gooey cream cheese filling and warm strawberries at their best!
How to Serve Fried Strawberry Cheesecake Sandwiches
These Fried Strawberry Cheesecake Sandwiches are not only delicious but also visually appealing! Presenting them creatively can enhance the overall dining experience.
Garnishes
- Powdered Sugar: A light dusting of powdered sugar adds sweetness and makes the dish look irresistible.
- Fresh Mint Leaves: A sprig of mint adds a pop of color and freshness, balancing the sweetness of the sandwich.
- Chocolate Drizzle: A simple drizzle of melted dairy-free chocolate enhances both flavor and presentation, making it even more indulgent.
Side Dishes
- Fresh Fruit Salad: A mix of seasonal fruits provides a refreshing contrast to the richness of the sandwiches while adding vibrant colors to your plate.
- Yogurt Parfait: Layer dairy-free yogurt with granola and berries for a creamy, crunchy side that complements your treat beautifully.
- Cinnamon Sugar Sweet Potato Fries: These sweet potato fries add a fun twist with their savory-sweet flavor profile and crunchy texture.
- Chia Seed Pudding: A light chia pudding made with almond milk is a great way to add some healthy fats and fiber to your meal while keeping it indulgent.
With these serving suggestions, you’ll not only impress your guests but also create a feast that’s as beautiful as it is delicious! Enjoy every bite of your Fried Strawberry Cheesecake Sandwiches!

Make Ahead and Storage
These Fried Strawberry Cheesecake Sandwiches are perfect for meal prep, allowing you to enjoy this delightful treat any time. Whether you’re preparing them for a special occasion or just want to indulge throughout the week, here’s how to store and maintain their deliciousness.
Storing Leftovers
- Allow the sandwiches to cool completely before storing.
- Place leftovers in an airtight container.
- Store in the refrigerator for up to 2 days.
Freezing
- Wrap each sandwich individually in plastic wrap or aluminum foil.
- Place wrapped sandwiches in a freezer-safe bag or container.
- Freeze for up to 1 month for best quality.
Reheating
- For best results, use a toaster or skillet to reheat.
- If using a skillet, add a little butter and heat over medium-low until warmed through and crispy.
- Alternatively, you can microwave them for about 30 seconds but note that they may lose some crispiness.
FAQs
If you’re curious about these delightful Fried Strawberry Cheesecake Sandwiches, I’ve got answers!
Can I make Fried Strawberry Cheesecake Sandwiches without cream cheese?
Yes! You can substitute cream cheese with a dairy-free cream cheese alternative or even a thick cashew cream for similar texture and flavor.
How do I customize my Fried Strawberry Cheesecake Sandwiches?
Feel free to add other fruits like blueberries or raspberries or even try different jams like peach or apricot. The possibilities are endless!
What can I serve with Fried Strawberry Cheesecake Sandwiches?
These sandwiches pair wonderfully with fresh fruit, whipped coconut cream, or even a scoop of non-dairy ice cream for an indulgent dessert experience.
How long do Fried Strawberry Cheesecake Sandwiches last?
When stored properly in the refrigerator, they will last for about 2 days. If frozen, they can be enjoyed within a month.
Final Thoughts
I hope you enjoy making these Fried Strawberry Cheesecake Sandwiches as much as I do! They are not only easy to whip up but also bring a sweet touch of joy to any meal. Remember to customize them with your favorite fruits and toppings. Happy cooking, and may every bite bring a smile to your face!
Fried Strawberry Cheesecake Sandwiches

If you’re in search of a delightful treat that combines comfort with flavor, look no further than these Fried Strawberry Cheesecake Sandwiches. Picture crispy bread enveloping a rich cream cheese filling and fresh strawberries, creating the perfect indulgence for breakfast, dessert, or an afternoon snack. Easy to prepare in just a few steps, these sandwiches are sure to bring warmth and joy to every gathering. With their golden crust and creamy interior, they offer a delightful experience that’s hard to resist.
- Prep Time: 10 minutes
- Cook Time: 6 minutes
- Total Time: 16 minutes
- Yield: Makes 4 servings 1x
- Category: Dessert
- Method: Frying
- Cuisine: American
Ingredients
- 8 slices of brioche or challah bread
- 4 oz cream cheese, softened
- 2 tbsp powdered sugar (plus extra for dusting)
- 1/2 cup fresh strawberries, sliced
- 1/4 cup strawberry jam
- 2 large eggs
- 3 tbsp milk
- 2 tbsp butter (for frying)
Instructions
- In a small bowl, mix softened cream cheese with powdered sugar until smooth.
- Spread the cream cheese mixture on one side of four slices of bread. Layer with sliced strawberries and a spoonful of strawberry jam before topping with the remaining bread slices.
- Whisk eggs and milk in a shallow dish to create an egg wash.
- Dip each sandwich in the egg mixture, ensuring both sides are coated.
- Heat butter in a skillet over medium heat and fry sandwiches for 2-3 minutes on each side until golden brown.
- Drain on paper towels and dust with powdered sugar before serving.
Nutrition
- Serving Size: 1 sandwich
- Calories: 360
- Sugar: 14g
- Sodium: 380mg
- Fat: 18g
- Saturated Fat: 10g
- Unsaturated Fat: 8g
- Trans Fat: 0g
- Carbohydrates: 43g
- Fiber: 2g
- Protein: 7g
- Cholesterol: 100mg